Toll Free: 1-866-508-6394
OR Contact Us
OR Contact Us
Shop by Category
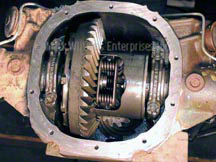
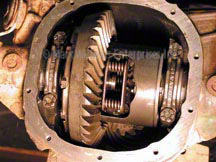
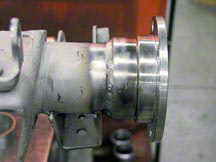
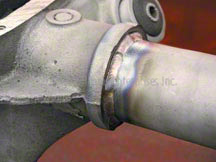
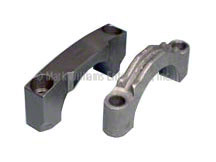
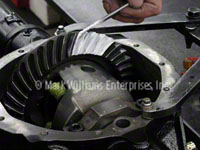
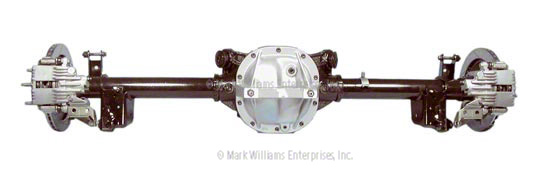 Our Mark Williams Prepared 8.8 features an Eaton Posi augmented by Richmond 3.73 gears, MasterLine 31-spline axles, 9 inch bearing ends, a billet pinion yoke, and a TA performance girdle to cover up everything. Baer 12 inch brakes were shipped to Mark Williams and installed at the same time as the buildup as well. | ||||||||||||||||||||||||||||||||||||||||||||||||||||||||||||||||||||||||||||||||||||||||||||||||||||||||||||||||
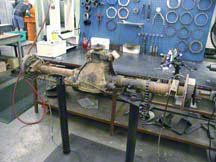
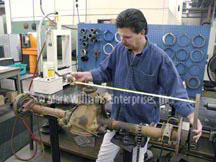
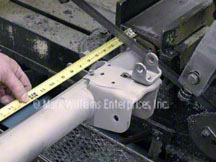
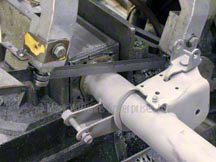
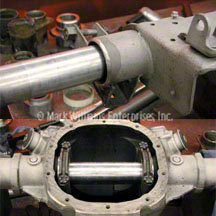
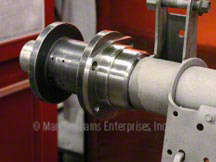
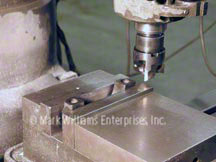
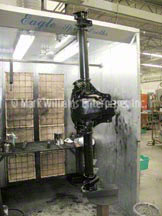
| Project Real Street gets some spunk under the trunk courtesy of Mark Williams Enterprises Our engine for Project Real Street, a Paxton Novi 2000-supercharged D.S.S. 306, will have plenty of torque and horsepower to propel us down the 1,320-or I-95 for the matter. But getting all that usable power to the ground has to be done with the right combination of parts. Since class rules dictate a manual transmission of production design-T5, T45, Tremec, and so on-we opted for the brute strength of the Tremec TKO. An aluminum drive shaft (composites aren't allowed in Real Street) will transfer power to the rear. Our last drivetrain decision became our rear-axle assembly. What should we run for best performance, strength, and ease of use? Our main decision came down to the axlehousing. Do we keep an 8.8 under the rear of the Real Street car, or do we go with the respected but heavier 9-inch rear? Since our Real Street car didn't have a V-8 spec rear under it (heck, it didn't have any rear under it), we had to start from scratch. While a 9-inch would be great for swapping gears easily, we wouldn't be road racing or circle-track racing. Once you figure out your combination, the track's always going to be a quarter-mile in length. We also figured that most people following along will be starting with an 8.8 production housing, thus our decision was made. The 8.8 axle would be used. But where to get one? We placed a call to Mustang Parts Specialties in Winder, Georgia, for one of its used 8.8s. Since we were going to be replacing the axles and differential, gear ratio and brake type were not considerations during our purchase. We just wanted a good 8.8 housing to start with. We had the housing truck-freighted to Mark Williams' facilities in Colorado. After discussing the project with the crew at MW, we decided to use the popular Eaton Posi unit in a 31-spline configuration along with MW MasterLine axles. To secure the axles, we had the technicians at MW convert the 8.8 with a TA Performance cover girdle and Baer 12-inch brakes. Check out Mark Williams' expert work in the photos. | ||||||||||||||||||||||||||||||||||||||||||||||||||||||||||||||||||||||||||||||||||||||||||||||||||||||||||||||||
| | ||||||||||||||||||||||||||||||||||||||||||||||||||||||||||||||||||||||||||||||||||||||||||||||||||||||||||||||||
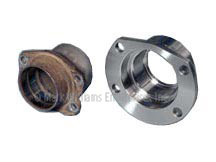
| Horse Sense: According to NHRA safety rules, a bolt-in device must retain all axles when running 10.99 or faster. That's fine if you're running a 9-inch, where such retention is factory. But the late-model 8.8 uses C-clips-small C-shaped retainers on the ends of the axles. If the axle breaks somehow (usually on a launch or burnout), the axle will come out of the axle tube. C-clip eliminators have been popular in the past, but we chose to go one better by using 9-inch -style axle-tube ends and their bolt-in axle hardware. | ||||||||||||||||||||||||||||||||||||||||||||||||||||||||||||||||||||||||||||||||||||||||||||||||||||||||||||||||
| | ||||||||||||||||||||||||||||||||||||||||||||||||||||||||||||||||||||||||||||||||||||||||||||||||||||||||||||||||
| ||||||||||||||||||||||||||||||||||||||||||||||||||||||||||||||||||||||||||||||||||||||||||||||||||||||||||||||||