
Toll Free: 1-866-508-6394
OR Contact Us
OR Contact Us
Shop by Category
By Wayne ScrabaThe Chevrolet 12-bolt rear axle is a prolific piece. It turns up in countless Camaros, Chevelles, Novas and full size Chevys. Although it may not be as popular as a 9-inch Ford in drag race applications, the 12-bolt does have a number of plusses (not the least of which is decent strength when carefully prepped). The other thing to consider is the shear volume of 12 bolts out there. Given the strength in numbers, we figured it was time to present a healthy collection of twelve bolt tech info and tips. Check out the following: | ||
TIP #1 -- EXILED CLIPS:When it comes to high performance GM axles, forget about c-clips. Use this: The housing end is a Mark Williams "small GM" design which incorporates the largest diameter bearing possible for a 12-bolt Chevy. The bearing (typically, a large diameter 45mm bore sealed assembly) greatly improves axles strength. The bearings are pressed on to the axles and held in place with the large c-shaped retainers shown in the photo. MW uses studs pressed into the housing end to hold the bearing retainer in place. All hardware is aircraft quality. More on the bearings later. | 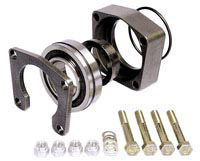 | |
TIP #2 -- BACK TO BUSINESS:This is the business end of a Mark Williams "Hi-Torque" axle. This particular axle is a MW “Masterline” piece for a 12-bolt. The axle does not use a c-clip groove. Instead, it's held in place with the bearing retainer system shown above. Using this arrangement insures that the axle won’t depart easily, even if fractured. And trust us, an axle that comes out the side of your car isn’t something to take lightly! | ||
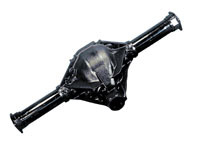 | TIP #3 -- NEW IRON:Need a new housing? Twelve bolts haven’t been built by Chevy for decades, but the aftermarket has certainly stepped up to fill the void. For example, Mark Williams offers new 12 bolt housings. This DTS housing from Mark Williams is a bolt-in replacement for a first generation Camaro or ’68-’74 Nova. By the way, they also offer housings for Chevelles, second generation Camaros, ’75 and new Novas, late model GM “G” and “A” bodies (for example, late model RWD Monte Carlos and Malibus), and torque-arm Camaros (’82 and newer). We should also point out the pieces you get from Mark Williams are proprietary (for one example, all of the MW housings have 4130 axle tubes). | |
TIP #4 -- CLASS FRAUD:You'd think that locating correct bearings for a rear end would be easy. Sorry. It isn't so. If you do your homework, you'll find an alarming number of "off-shore" imports masquerading as real bearings. Finding quality bearings on a local level can become a frustrating experience. Because of this fact, Mark Williams Enterprises have introduced "ring and pinion installation kits". These kits make use of high quality, Made-In-The-USA Timken bearings throughout. When searching the local bearing supply outlets, don't take second best. The good stuff only costs pennies more but the difference in quality is staggering. |  | |
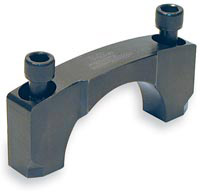 | TIP #5 -- SPITTING OUT THE CAPS:The rear bearing caps found on original Chevy twelve bolt housings are cast iron and aren't renowned for their strength. The torque forces of the powerplant will try to push the carrier out the back of the housing, placing additional strain on the driver's side bearing cap. As the car accelerates, the ring gear attempts to climb out of the case or housing. To solve this problem, companies such as Mark Williams and others offer machined steel bearing caps that can be used to replace one or both of the factory caps. If installing a single cap, then the driver's side carrier bearing should be replaced. | |
| In order to custom fit the steel cap to the housing, the bottom of the cap is milled. Align boring of the housing is not required. In most cases, installation of the cap is completed by way of a set of extra-long Grade 8 allen-head cap screws. Another consideration is this: Something most seasoned twelve bolt veterans will notice immediately on a Mark Williams DTS housing are the huge caps. As mentioned in the previous tip, a standard Chevy twelve bolt often requires at least one aftermarket billet cap on the driver's side of the housing to stop cap walk. The reason for this is because under acceleration, the ring gear tries to walk around the pinion. In turn, this motion places extreme forces against the driver's side cap, literally forcing it backwards out of the housing. Additionally, inside the MW DTS housing, the area surrounding the caps is solid (not so on OEM 12-bolts). | ||
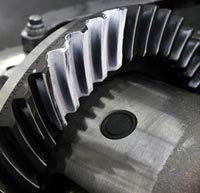
TIP #6 -- ROCK HARD:Believe it or not, there's more to selecting a ring and pinion for your 12-bolt than choosing the gear ratio. For example, Richmond Gear offers "street gears" and "pro gears". Here’s some comparative info: Rockwell hardness tests of OE production line gears reveal a typical minimum Rockwell "C" specification of approximately 59-63. The Richmond 8620 material "street" gears register approximately 60-64 on the Rockwell scale. Richmond "Pro gears" (9310 material) will register approximately 52-56 on the Rockwell "C" scale. Why incorporate a "soft" construction for high performance gears? The reason is impact loading. When a relatively high amount of shock loading is introduced into a conventional "hard" ring and pinion, the gears can shatter. Softer construction allows for a certain amount of tooth "bending", but this is certainly preferred over shattered teeth. Because of the differences in Rockwell hardness, gears destined for drag race use only ("Pro" series) are not appropriate for street or street-strip use. The gears wear rapidly because of the softness. Due to this fact, all cars destined to see some amount of street use should make use of street gears. | ||
TIP #7 -- AXLE ALTERNATIVES:When it comes to axles for your 12-bolt, keep in mind that there are major differences between street axles and racecar axles (although they may in fact look the same on the outside). Primary differences are in the axle metallurgy. You see, a street driven musclecar is often heavier and must operate under much more severe road conditions than a racecar. If incorrect axles (dedicated race axles or some OEM-style race axles) are used in a street car application, there is a risk of breaking the axle flange. That's why companies such as MW offer different axles for different applications. | ||
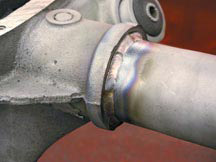 | TIP #8 -- WEEPING TEARS OF OIL:In stock form, twelve bolt axle tubes are attached to the coconut with a couple of spot welds per axle tube. In almost all cases, these welds are not sound and under close examination, pinholes in the welds become evident. This really doesn't compromise strength in a housing that has been totally welded to the center section, but there is still one major problem: The factory welds often seep lubricant. Because of this, more than one twelve bolt has seen major seal, gasket and drain plug work, only to find that the leak was in the area of a factory spot weld. | |
| The fix is relatively simple in theory, but difficult and time consuming to accomplish. To fix the problem once and for all, grind away the factory welds. Next, using a plug weld or "rosette" process, replace the factory weld with a heli-arc bead. It's a messy, slow process, but the result is a clean, leak free housing. Mark Williams points out that if you pre-heat a junkyard housing, that does a wonderful job of removing the grease. Additionally, Williams notes they always use a 304 stainless steel rod for welding the center section to the axle tubes. FYI, the MW DTS housing shown in the accompanying photos also incorporates the factory style spot weld locations, but the welding process is different, so there is no problem with weeping. | ||
TIP # 9 -- SPLINE SPECIAL:Axle splines are important too. In stock form, a 12-bolt is equipped with a 30-spline axle. In comparative shear strength, a 35-spline axle (using the MW spline as an example) is 89% stronger. And those calculations are based upon the physical dimensions of the spline itself and don’t take into account the considerable added strength an aftermarket forging has. Bottom line? If you want to increase axle strength, increase the spline count. | ||
TIP # 10 -- LOCKED UP:The vast majority of drag race cars use a "spool" instead of a differential. That’s no big secret. The spool is a simple piece of equipment that provides a solid link between the ring gear and the axles. Because of this, both wheels receive an equal amount of torque, all of the time. Now here’s something to consider: If you decide to run a spool on the street, remember that the car could be a handful when the streets are slippery (i.e.: it rains). Further to this, the spool places a considerable load on the axles. Don't be tempted to run a spool without proper aftermarket axles! | ||
TIP # 11 -- SEVERE DUTY POSITRACTION:The folks at Mark Williams have recently released a new twist on the heavy duty twelve bolt differential. This differential is based upon a heavy duty Eaton piece, and features a thicker, webbed flange on the case (which is also reinforced) that reduces ring gear deflection. Spider gears are forged from tool steel (approximately 50% stronger than the popular Chevrolet service package pieces). Four more friction discs are included (total of 22 discs) which allows for more even distribution of shock loads to the side gears. The added friction discs also help to improve the torque split ratio. Spring plate size as well as the springs are substantially larger than a stock Chevrolet differential. This modification provides for an even bias ratio between the rear wheels. The result? | 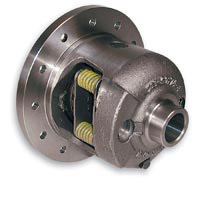 | |
| Improved straight-line traction. Perhaps most important, the new heavy duty Mark Williams posi unit is available for use with huge 33-spline axles, which is a decided improvement over the factory 30-spline system. Essentially, MW blueprints a heavy duty Eaton posi unit, and then modifies it to accept 33-spline axles. Although custom axles are required for this positraction assembly, it is virtually bulletproof. Finally, the heavy duty MW positraction units are designed for use with ring and pinions ranging from 4.10:1 to 6.14:1. | ||
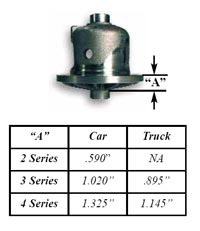 | TIP #12 -- CARRIER CONFUSION:When shopping for 12-bolt differential parts, keep this in mind: Chevrolet generally used three different types of differentials for the 12-bolt -- the two series carrier, the three series carrier and the four series carrier. The "two series" has little use in a hi-po application and should be avoided if at all possible. The three series carrier accepted ring and pinions that ranged from 3.08:1 to 3.73:1 while the four series carrier accepted ring and pinions ranging from 3.90:1 to 6.14:1. While there are a number of subtle variations between the three types of carriers, a major difference is the thickness of the gear flange. Two series carriers are the thinnest while three series flanges are thinner than four series flanges. Because of the size of the flange, the carriers cannot be randomly used with ring and pinion sets from the trio of "families". | |
| Unless of course special gears with custom ring gear mounting surfaces are used. These special gears are readily available from Richmond Gear. Additionally, the two series carriers do not have any webs on the top of the carrier. Three and four series carriers do have webs. FYI, virtually all aftermarket spools are engineered for use with 4-series gears, and as far as positraction units are concerned, the preferred choice is obviously a four-series setup. | ||
TIP #13 -- AROUND AND AROUND SHE GOES…According to the experts at Mark Williams, axles endure have to endure two types of loads: torsional loads (twisting) and bending loads. The larger the diameter of the axle, the greater its ability to withstand these forces. If the axle diameter is doubled from 1.0-inch to 2.0-inches, this increases the torsional strength eight times. Naturally, it's almost impossible to double the diameter of an axle, but in many cases it is possible to increase both the size of the axle shaft and the number of splines to improve upon overall strength. A good example of this is a 12-bolt equipped with the heavy duty Mark Williams-Eaton posi unit or an aftermarket spool. Using the big custom MW positraction unit as an example, the axle spline count increases from a stock 30 splines to a 33-spline configuration. While this might not seem like a major improvement, the resulting strength improvement is close to 33% over a stock axle spline. The increase in spline count in turn strengthens the axle by increasing the axle's "minor" diameter. | ||
TIP # 14 -- LUBE JOB:What type of lubricant is recommended for the 12-bolt? According to the experts at Mark Williams, there are no trick lubricants for a drag race 12-bolt. They recommend their own special custom blended mineral-based Torco lubricant. Be careful when filling the assembly. It can easily be overfilled. Filling is accomplished by leveling the housing, pulling out the filler plug (found at the passenger side of the housing -- ahead of the inspection cover) and adding the lubricant. Two quarts is almost perfect. If any more lube is added, it will run out of the filler hole. By the way, additives for posi-units are not required. The MW spec Torco lube includes EP compounds to keep a positraction assembly happy. | 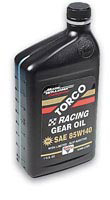 | |
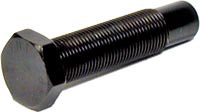 | TIP # 15 -- ENGAGEMENT SOIREE:It might come as a surprise to you, but a stock Chevy intermediate/compact wheel stud size of 7/16-inch is not adequate for any vehicle destined for high performance or competition use (even mild competition). All high performance applications should have their studs replaced with a minimum 1/2-inch stud. Companies such as Mark Williams do not offer axles in the 7/16-inch stud form and supply all axles drilled and tapped to accept 1/2-inch or larger studs. Proper studs are fashioned from Grade 8 materials and are threaded all the way to the head. Because of this feature, the bolt can be fully engaged in the backside of the axle. More on studs later. | |
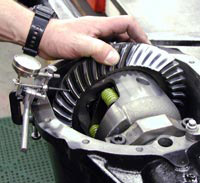
TIP #16 -- CARRY THIS:When setting up a 12-bolt Chevy rear axle, be careful when setting the carrier bearing preload. Too much bearing preload will kill the bearings almost instantly. Too little preload will cause the carrier to move back and forth. In order to check the preload, install an inch-pound torque wrench on the pinion nut and measure the preload without the carrier installed in the housing. Then repeat the process with the carrier installed. Installed, the pinion nut will require between 7-1/2 to 10-inch pounds more force to turn than when the carrier was empty. By the way, preload is adjusted by adding or subtracting equal thickness shims to both sides of the carrier. Adding shims increases the preload. Removing shims decreases it. Mark Williams points out that you really should use a spreader tool to set up a 12-bolt. It definitely beats pounding the shims in with a hammer. | ||
TIP # 17 -- THE YOKES ON YOU:Don't discount the fact that the pinion yoke is the potential weak link in the rear end chain. Most OEM GM yokes are plenty fragile cast iron pieces, and for the most part, they can't accept a large diameter, bulletproof universal joint. A sound solution is this 4340-forged steel yoke from Mark Williams. Following forging and heat-treating, the yokes are CNC machined to exact tolerances. Each yoke is symmetrical for balance and alignment. Special snap ring grooves also allow for easy u-joint installation. Finally, they're designed to accept a massive, almost indestructible Spicer 1350 universal joint. | 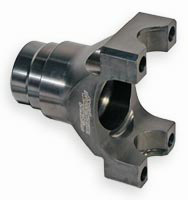 | |
 | TIP # 18 -- MAGIC MARKERS:You’ve probably heard the tip about using machinist's blue or dye instead of gear marking compound when setting the gear pattern in a rear end. Forget about it. It doesn't work. The best stuff to use is correct gear marking compound. Quality installation kits such as this piece from Mark Williams include the correct yellow marking compound. | |
TIP # 19 -- PATTERN FOR PERFORMANCE:When setting up ring and pinions, you'll often hear the term "balanced pattern". What does it mean? According to Mark Williams Enterprises, it's one where the "wipe" of the pinion gear against the ring gear is equal on both sides of the ring gear | ||
| tooth. Having a balanced pattern simply means improved gear life, but a side benefit is less noise. In addition, a proper pattern will look like a relatively long, smooth shaped oval, and it should slightly favor the toe or inside of the ring gear. Why should the pattern favor the toe side of the ring gear? In a typical hi-po situation, the pattern will "stretch" under loads (which can be quite high -- especially if there is some power under the hood and some hook at the back end of the car). In essence, this pattern reaches from one end of the gear tooth to the other (from the toe to the heel). If the pattern favored the "heel" or outside portion of the ring gear, then there's a good chance that the "pattern" or true contact area will go right off the end of the ring gear. It should be noted that a pattern that favors the toe or inside of the gear tooth will be somewhat noisier than a heel pattern, but in this case, that is a small price to pay for reliability. | ||
TIP # 20 -- I HAVE A CRUSH ON YOU:12-bolts incorporate crush sleeves on the pinion. A crush sleeve or collar is a round metal tube with a "kink" in the center. As the name implies, it is designed to "crush" as torque is applied. The purpose of this component is to preload the bearings. Once installed, it is difficult, if not impossible to re-use it. Because of this fact, it should not be installed during the initial stages of ring and pinion setup. By the way, Mark Williams now offers a solid preload spacer for the 12-bolt which eliminates most of this aggravation. | ||
TIP # 21 -- PRE-ASSEMBLY ASSEMBLY:When setting up a ring and pinion, part of the MW pre-assembly ritual includes a thorough parts cleanup, but also included is the installation of the ring gear to the carrier (differential or spool) assembly. All of the threaded holes should first be cleaned with a tap prior to installation. Loctite should be used on all threads on the ring gear, not on the bolts. Why not? According to Mark Williams, hydraulic pressure forces the Loctite off the bolt threads as they are tightened. If Loctite is used on the female threads on the ring gear, it can’t be displaced. Makes sense to us. FYI, Mark Williams specifies proprietary safety-wire drilled bolts from ARP for their installation kits. The reason is, a properly “safetied” fastener will never fall off. | ||
 | TIP # 22 -- BACK IN A LASH:In order to check backlash on a rear end, you have to set up a dial indicator against the ring gear teeth. Install the dial indicator in a plane that is perpendicular to a tooth, and then wrap a rag around the pinion yoke. With a careful hand, gently move the ring gear with a back and forth movement (the pinion stay stationary). According to Mark Williams, the ideal gear backlash dimension is between 0.010-inch and 0.012-inch for a drag race 12-bolt rear axle. If those backlash numbers seem a bit large, there’s method to the advice: (1): As the rear end reaches operating temperature, the dimensions | |
| close. If the dimensions are too tight, then the gear set will experience gauling. (2): Drag race “Pro Gears” are softer than normal for shock resistance. As a result, the tips of the gears physically bend. If and when the teeth deform, and there is too little clearance, then there is no room left for gear lube. The end result will be ultimately be ring and pinion failure. | ||
TIP # 23 -- REAR END BREAK-IN:When you've finished rebuilding a 12-bolt, it's best to break it in before you "pound" on it. Here's a quick break in routine: Drive the car forward and in reverse several times. Then drive the car around in either direction (circles). Listen for any unusual noises and watch for unusual vibrations. It's also a good idea to jack the wheels off the ground and "warm" the rear lube prior to using the fresh rear end. Once this is done, the rear end should be ready for use (and abuse). | ||
TIP # 24 -- CRITICAL NUMBERS:If you carefully examine an aftermarket ring and pinion gear set, you'll find that the pinion gears are etched with gear set number. You'll also find that the pinion depth is also etched next to the set number. Generally speaking, this is the distance from the rear of the pinion to the centerline of the carrier. Similarly, the ring gear will also be etched with the set number. The ring gear will also carry a backlash specification. These figures can save countless time when setting up the rear end. In addition, Mark Williams points out that if you use a pinion depth gauge for set up, keep in mind that it will get you close, but you’ll still need to work with the gear pattern for the final setup. | ||
TIP # 25 -- WHERE'S THE BEEF?Most custom axle manufacturers offer several choices for wheel bolt circle patterns. According to the pros at Mark Williams, pick the largest possible bolt circle that "fits" the application. Here's the way it works: When the pattern size is increased, the unit load per stud is reduced. The larger the bolt pattern diameter, the lower the force imposed upon the stud. As an example, a stud on a 5.0-inch diameter bolt circle carries 11% less force than an identically sized stud on a 4-1/2-inch diameter bolt pattern. It is often possible (and relatively easy) to re-drill the brake drums so that axles with a larger-than-stock bolt pattern can be used. Obviously, if stock wheels are planned for your ride, this method of increasing the bolt circle is limited. Keep in mind that the Chevy pattern of 4-3/4-inches is larger than stock FoMoCo or Mopar passenger car patterns. Because of this, the unit load on each stud is less.
| ||